
To review, my list was:
Flyrant with 2xTL Devourers
3 Zoanthropes in a Mycetic Spore
Tervigon with Catalyst
15 Termagants with Devourers
Mawloc
My opponent's list (who I regret to admit, I've forgotten his name) was about the following:
Haemonculus with Liquifier Gun
3 Kabalite Trueborn: 2 Splinter Cannons
4 x 5 Kabalite Warriors with 1 Blaster in a Venom with 2 Splinter Cannons
2 x 5 Kabalite Warriors with 1 Blaster in a Raider with a Disintegrator
2 x Ravagers
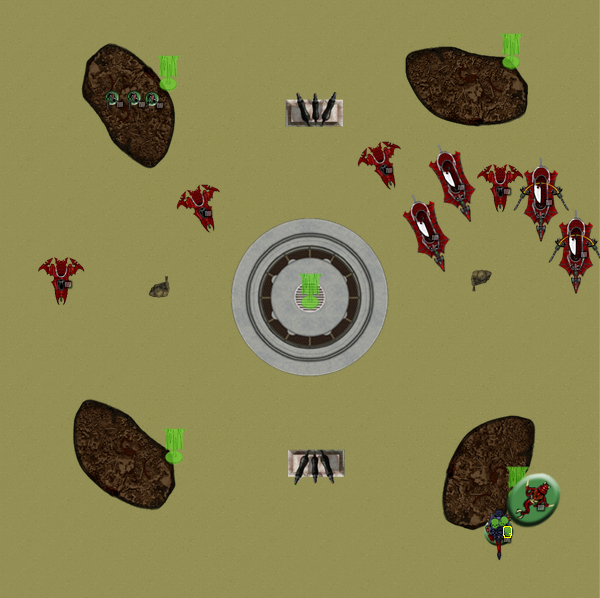
Deployment:
The mission was Big Guns Never Tire, with 5 objectives. Placement saw them wind up as more or less a NOVA-style setup, one centrally placed with the others near each corner. I won the roll for deployment and chose to go second, which in hindsight might have been a mistake. The Dark Eldar spread out across their deployment zone, with one Raider shielding the Ravager and the Haemonculus Raider.
I chose to keep my Hive Tyrant and Termagants in reserve, which in hindsight might be mistake number two. I deployed just the Mawloc and the Tervigon on the right, hiding behind a rock.

Turn 1:
All of the skimmers moved forward and toward my right flank. Everything in the army that could see the Tervigon shot at it, but it managed to survive.

In my turn, I took a bit of a risk and burrowed the Mawloc. Meanwhile I spawned a decent number of gants and moved them and the tervigon up, taking a couple ineffectual shots at my attackers.
Turn 2:

The skimmer armada continued to move up. The Haemonculus and friends wiped out the termagants while the Ravagers and two Venoms took down the Tervigon.

In my turn, I rolled well for reserves and everything arrived. The Mawloc popped up first and destroyed one of the venoms, killing two of the occupants and leaving the survivors in a crater. The Flyrant swooped on the board and performed a vector strike on the Haemonculus's Raider, wrecking it. The Zoanthropes landed behind the main force and the Termagants arrived on the same flank. My fire was directed at various gunboats around me to little effect. One Ravager denied the witch twice on my Zoanthropes, and took a single hull point from the remaining beam power.
Turn 3:

The Venoms generally spread out, dropping their cargo on assorted objectives. Meanwhile fire took down the Mycetic Spore, one Zoan, the Mawloc, and most of the devilgants. The Haemonculus charged the devilgants, who cut down two of the bodyguard with overwatch, and killed the others in combat. The haemonculus ran away and was not caught by the remaining devilgants.

In my turn the flyrant vector struck and killed the haemonculus. My remaining fire was once again ineffectual, with the lucky ravager again shrugging off the majority of the fire directed its way.
Turn 4 saw me get tabled with ease, leaving a final result of about 12-1 (3 Objectives, First Blood, Slay the Warlord, and Linebreaker vs. Slay the Warlord). Unfortunately, the game was more or less a foregone conclusion in my mind. That said, I still had fun in the loss, which is something I'm usually not good at.
Lessons Learned:
One way to be ok with getting destroyed, at least for me, is to go back and try to learn something from the game.
First off is army composition. My list is not meant to deal with a mechanized army, particularly one that has more vehicles than I have units. The first solution would be to drop the Mawloc for Hive Guard. I will freely admit that the Mawloc was there more for aesthetics than effectiveness. Dropping him would let me field 3 Hive Guard with points left over. Alternatively, or in addition, I could add a fourth Zoanthrope and split them in two, with an additional Spore if possible. The three Zoanthropes were extremely effective in the first two games, and generally had a lot of wasted overkill. Letting them pick two targets could increase their effectiveness. My thought is to drop the Mawloc and 3 Devilgants for 2 Hive Guard, a Zoanthrope, and a Mycetic Spore.
Second, and in regards to this final game in particular, is my choices for reserving. To a degree, keeping most of my army off the board allowed my opponent to focus on small parts of my army. While everything else came in turn 2, at that point I was limited in my potential responses. As the Tervigon showed in Turn 1, while I was facing a lot of firepower, it couldn't wipe out everything. But because there was almost nothing on the board, I couldn't hit back, essentially giving my opponent a free shooting phase with no reprisals.
In hindsight, I should have kept first turn against this army, and left at minimum my Flyrant on the board, if not the devilgants as well. The problem was I got stuck on my original, generic plan of outflanking the devilgants, and my past success the previous game holding the flyrant in reserve. The Flyrant starting on the board would have been able to easily wipe out the Trueborn squad on foot turn 1, giving me first blood. Additionally, the devilgants would have had range to at least one skimmer turn 1 and probably been able to gun it down where the spawned gants and Tervigon could not.
Additionally, with the strategy I did implement, I brought the devilgants on in the wrong spot. I believe I got to choose their board edge, and chose poorly. I should have opted for the opposite edge and again, wiped out the trueborn. Coming on the opposite side of the majority of the action would have forced my opponent to split his forces somewhat to deal with the devilgants.
No comments:
Post a Comment